Learning Django by Example(1): Start the Engine
django pythonThis is yet another Django tutorial, it makes a difference as:
-
the author is totally a novice about Django programming, he has little experience on database and Web framework. You may find it interesting how a newbie benefit from the elegant design of Django.
-
each step is carefully recorded via Google Code, you can check out the snapshot to understand how the project evolves.
Translations are freely permitted as long as they are released under Attribution-Noncommercial-Share Alike Creative Common License. Learning Django by Example has already been fully or partially translated into several languages. If you translate it into another language and would like to be listed here, just let me know.
- Spanish, thanks to Tomcask
Think Big
I really love the intuitive interface of Delicious Library, unfortunately, it is Mac-only, and it may not scale due to the lack of database server support. Personally I prefer a small daemon running silently in my old Gentoo box to serve contents to all clients, cross-platform and it is supposed to scale when the library grows, and I may share the resources with my friends. So I decide to brew my tea: Gelman, named after the library in the main campus of the George Washington University.
I choose Django for the python on rail
NOTE: In the following tutorial, I would show the code snapshot in each step, when I mention check r#, you can checkout the code via:
svn checkout http://gelman.googlecode.com/svn/trunk/gelman -r3 gelmanin the case, # is 3.
Start the Engine
Installation of django-0.96 in Gentoo is like a breeze, just emerge it. And follow the official tutorial to initialize the project and setup the database, sqlite3 is used in the rest of tutorial for the sake of simplicity. When it is in production use, we would migrate it to MySQL . Check r5.
Next, add an application library:
python manage.py startapp libraryGelman is designed as a lightweight eBook management system, so it make senses to reuse existed components and Web services. For example, the meta data is from Amazon Web Service(aka AWS), the tag suggestion may come from Yahoo. Only the essential information is stored locally, such as the mapping between the meta data and eBook. The following models, Author, Publisher and Book are added.
class Book(models.Model):
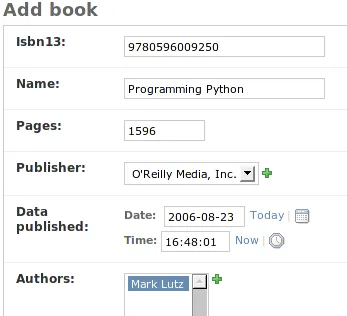
    isbn13 = models.CharField(maxlength=13, primary_key=True)
    name = models.CharField(maxlength=255)
    authors = models.ManyToManyField(Author)
    pages = models.IntegerField()
    publisher = models.ForeignKey(Publisher)
    pub_date = models.DateTimeField('data published')
ISBN-13 is the latest standard, we may add ISBN-10 later if necessary. Author
and Book is many to many related, so use models.ManyToManyField as
suggested.
Finish the following boilerplate work to make it run:
- Add
django.contrib.admintoINSTALLED_APPSsetting - Sync the change to the database
- Edit the
urls.pyto enable theadminpage
Now we can login to admin using bookstack and gelman as the Username and Password, check r7.
Initially, books are added manually for a test drive, we would automate this tedious procedure later. Notice the link between the Book and Publisher, it is really cool that the admin would help us to handle the relation of models.

Add one line to the urls.py to enable the user interface for normal users:
(r'^library/(?P\d+)/$', 'gelman.library.views.detail'),Add the detail.html in template/books as the view template, don’t forget to
set TEMPLATE_DIRS variable in settings.py, then implement detail in
library/views.py:
def detail(request, isbn):
    book = get_object_or_404(Book, isbn13=isbn)
    return render_to_response('books/detail.html', {'book': book})
Now we can access the data via ISBN link, it is just a boring raw text, we would refine it later. Check r8.
Make Librarian happier
In a real library, the user may browser, search, borrow, return books, but only librarian manage the collection. It is less fun to type all the meta data of the book while we can fetch it from Amazon. As a librarian instead of bar code reader, I prefer title/keyword than boring 13 digital numbers.
And AJAX of course, who is not using it? I will eat my own dog food, The Dojo Javascript Toolkit. You can either use dojo-0.9 release to take full advantage of AOL’s CDN(thanks, Alex) or the SVN version just as I did.
how to server the static file
is probably the most frequently asked question in #django since the regular
expression based URLConf more or less overkill, :-)
(r'^static/(?P.*)$', 'django.views.static.serve', {'document_root': '/home/bookstack/projects/media'}),And prepare the files as well:
cd /home/bookstack/projects/media;
mkdir scripts
sudo mount -o bind $DOJO_ROOT/trunk scripts
Now dojo.js will be linked to here
Consider users may input dash and space in ISBN, we need to override the default
maxlength attribute of Isbn13 and add a validation for ISBN using
JavaScript:
dojo.addOnLoad(function () {
  var p = dojo.byId("id_isbn13");
  var n = document.createElement("div");
  p.parentNode.appendChild(n);

  dojo.connect(p, "onblur", function () {
    if (isValidISBN(p.value)) {
      n.innerHTML = "Searching...";
    } else {
      n.innerHTML = "Invalid ISBN";
    }
  });
  p.removeAttribute("maxlength");
});NOTE: isValidISBN is merged into dojox.validatie.isbn, renamed as
dojox.validate.isValidIsbn. That is just one of benefits to run dojo SVN.
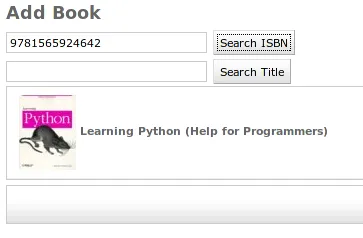
It is a good chance to customize the admin page, a new template add.html is
added:
{% block content %}
    <div id="content-main">
    <h1>Add Book<h1>
        <input type="text" id="id_isbn13" class="vTextField" name="isbn13" size="30" value=""/>
        <input type="button" id="search_isbn" value="Search ISBN" />
        <div id="isbn_valid"></div>
        <input type="text" id="id_title" class="vTextField" name="title" size="30" value=""/>
        <input type="button" id="search_title" value="Search Title"/>
        <form action="" method="post" id="book_form"> <div>
            <fieldset class="module aligned ()" id="books">
            <div class="form-row" id="firstrow"> No book found
            </div>
            </fieldset>
                <div class="submit-row">
                    <input type="submit" value="Save and add another" name="_addanother"  />
                    <input type="submit" value="Save and continue editing" name="_continue" />
                    <input type="submit" value="Save" class="default" />
                </div>

        </div></form>
    </div>
{% endblock %}
If we use XMLHttpRequest, we have to go through the boring XML parsing and
deploy a proxy to bypass cross-domain AJAX. Neither of them is pleasant. AWS’s
JSONP interface is the rescue. In dojo 0.9, dojo.io.script.get replaces the
magic dojo.io.bind with Twisted-like syntax,
that make it even sweeter.
dojo.connect(searchISBN, "onclick", function () {
  dojo.io.script
    .get({
      url: "http://xml-us.amznxslt.com/onca/xml",
      content: {
        Service: "AWSECommerceService",
        SubscriptionId: "19267494ZR5A8E2CGPR2",
        AssociateTag: "kokogiak7-20",
        Operation: "ItemLookup",
        Style: "http://kokogiak.com/amazon/JSON/ajsonSingleAsin.xsl",
        ContentType: "text/javascript",
        IdType: "ISBN",
        ResponseGroup: "Medium",
        SearchIndex: "Books",
        ItemId: isbn.value,
      },
      callbackParamName: "CallBack",
    })
    .addCallback(function (response) {
      var item = response.Item;
      var row = dojo.byId("firstrow");
      row.textContent = null;
      var node = document.createElement("div");
      node.innerHTML = '<div> <img src="' + item.thumburl + '"/> ' + item.title;
      row.appendChild(node);
    });
});NOTE: All the parameters are case-sensitive, especially CallBack for
callbackParamName. Check r11 for the updated version, further explanation
is in section 2.
The above code is dojoized
Kokogiak’s idea,
and we still use his ajsonSingleAsin.xsl for quick prototype, we would develop
a XSLT to meet our requirement in the next section.
