A very old Kindle
hackrootI bought a second-hand Kindle DX in 2009 as to read tech books, — usually in PDF format in my commute. It still plays strong after a decade, though with normal wear and tear:
- It is absolutely out of warranty, and the device will not receive any future updates.
- Amazon dropped the registration support in 2017, then recant with Kindle Service Update. Anyway, resell might be quite a hassle.
- The experiment browser does not support SSL, which make it impossible to browse internet in nowadays.
Nevertheless, the device is still capable as a ebook reader, and without the warranty constraints, we can explore all the possibilities.
Jailbreak
Jailbreak opens the door for us to peek what is behind the curtain via usbNetwork, and extend other features, such as font hack. Follow this mega thread in MobileRead forum:
- Download the
kindle-jailbreak-0.13.N.zip, unzip the file and copy theUpdate_jailbreak_0.13.N_dx_install.binto the root of Kindle. - Go to Home -> Menu -> Settings -> Menu -> Update Your Kindle, the device will install the update and reboot.
usbNetwork hack
With usbNetwork hack installed, we can ssh / telnet to the Kindle device
with a backstage access pass.
The default IP address of Kindle DX’s usbNetwork is 192.168.2.2, and we should
setup the host IP address as 192.168.2.11.
- Dowloand the
kindle-usbnetwork-0.57.N-dx.zip, unzip the file and copy theUpdate_usbnetwork_0.57.N_dx_install.binto the root of Kindle, the following the above instruction to install the hack. - In the Kindle device, press DEL to summon the input box, then type the following commands, each ended with enter:
;debugOn
`usbNetwork
;debugOff
It is worthy noting that you should use ~usbNetwork for more recent Kindle
models.
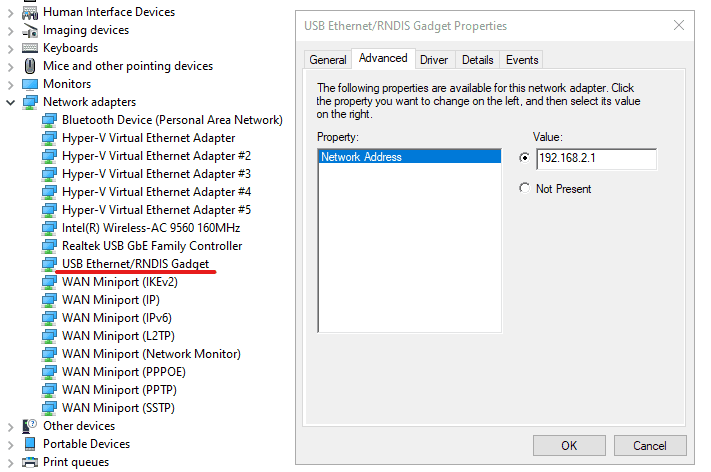
Plug the Kindle to your computer with USB cable. In Windows, you should be able
to identify a new network adapter called USB Ethernet/RNDIS Gadget in the
Device Manager; right click the device, and choose the Property from the
context menu, switch to Advanced tab, and set the Network Address value to
192.168.2.1; then click OK to close the dialog.

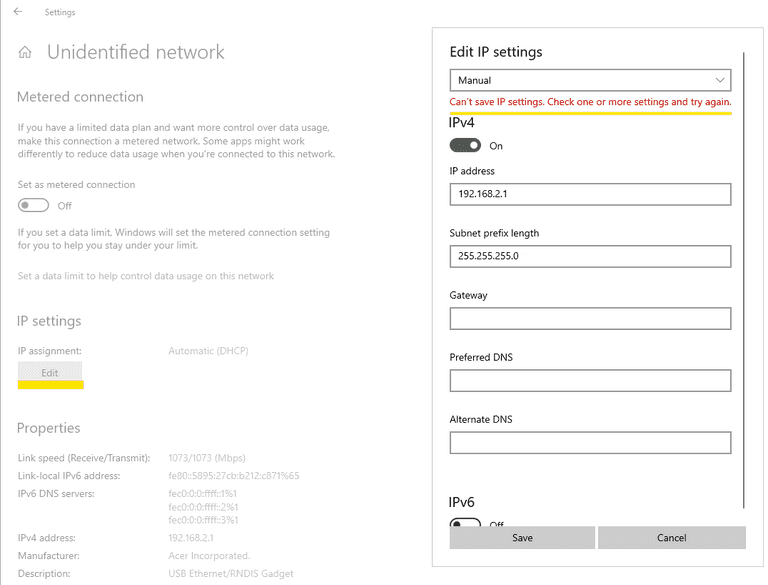
In the Settings | Nework & Internet | Ethernet, pick the network likely for RNDIS adapter, Undefined network for my case. Click Edit and setup the IP address manually:

I continually received the highlighted error message for some unknown reason, so I continued the network configuration via command line.
Run the command prompt with administrator elevated privilege:
netsh interface ipv4 show configto list all your network interfaces. In my case, it is Ethernet 4.
Then configure the network as:
netsh interface ipv4 set address name="Ethernet 4" static 192.168.2.1 255.255.255.0 192.168.2.1Now we can simply ssh to the Kindle DX via ssh root@192.168.2.2. You can turn
off the usbNetwork by rerun the `usbNetwork command.
Poking around
Here are some findings when I poked around:
- Kindle DX runs in Linux kernel 2.6.22:
[root@kindle root]# uname -a
Linux kindle 2.6.22.19-lab126 #3 PREEMPT Thu Jan 13 18:13:20 PST 2011 armv6l unknown- The java runtime is J2ME, more concretely Connected Device Configuration(CDC).
[root@kindle root]# /usr/java/bin/cvm  -version
Product: CDC HI (1.1.2-b02)
Profile: Personal Basis Profile 1.1.2 (Specification 1.1.2)
JVM:     CDC HI 1.1.2-b02 (mixed mode)
I then dumped the /opt/amazon/ebook to the host machine for further
investigation:
scp -r root@192.168.2.2:/opt/amazon/ebook .With the help of Java Decompiler, the
Browser.jar loads a native mobile browser, called netfront, aka
/usr/java/lib/libnetfront.so.3 for the experimental web browser. I was
confused that who dropped the ball to support SSL:
- The error message
"-190", "Basic Web is unable to make a secure connection at this time. Please try again later."defined inNativeEngineErrorCodeResourcesuggests that the native engine, aka netfront does not support SSL. - The UserAgent is configured in the
netfront.iniasua=Mozilla/4.0 (compatible; Linux 2.6.22) NetFront/3.4 Kindle/2.1 (screen 600x800). Presumably, we are running NetFront 3.4, which is supposed to support SSL, according to this page.
The system should support SSL as the registration endpoint uses HTTPS,
https://firs-g7g.amazon.com/FirsProxy/.
Font Hack
The Kindle DX ships Caecilia for serif, and Helvetica for sans-serif, neither supports CJK language rendering. With font hack, you can fix this by overriding system with CJK-capable fonts, or just dovetail for your personal taste.
Download the kindle-fonts-5.16.N-k2.zip, extract and install the
Update_fonts_5.16.N_dx_install.bin. After reboot, we can replace the
Serif_*.ttf with Song(宋体), such as
思源宋体; and Sans_*.ttf
with Hei(黑体).
If you do enjoy the original look and feel, you may consider to merge Caecilia
and Helvetica with CJK-capable serif and sans-serif font respectively. They
can be found in linkedfonts/backsups.
Kindlet Development
Amazon announces the Kindle Development Kit program in 2010, and shut
it down in three years. Amazon is kind enough to host the
JavaDoc online, and you can
grab the Kindlet.jar from /opt/amazon/ebook/lib/.
The kindlet development might be worthy a dedicated post for discussion. Stay tuned.
- Kindle4’s default IP address is
192.168.15.244, and the host ip address, aka the Windows’ ip address should be set as192.168.15.201.↩